Difference between revisions of "Jacob Springs raw milk program"
Ashleyu623 (Talk | contribs) (→Cows) |
Ashleyu623 (Talk | contribs) (→Milking procedures) |
||
| Line 44: | Line 44: | ||
===Milking procedures=== | ===Milking procedures=== | ||
| + | ====Preparation==== | ||
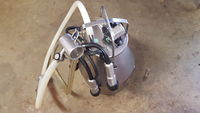
#Assemble claw and lid; affix to milking bucket. (x2.) [[File:20150907 072040.jpg|200px|thumb|right|Milking can, fully assembled]] | #Assemble claw and lid; affix to milking bucket. (x2.) [[File:20150907 072040.jpg|200px|thumb|right|Milking can, fully assembled]] | ||
| Line 51: | Line 52: | ||
#: Swish cap in hot water to clean it before putting back on container. | #: Swish cap in hot water to clean it before putting back on container. | ||
#: Get 2 dairy rags. One goes into the udder wash and one will be used for drying. | #: Get 2 dairy rags. One goes into the udder wash and one will be used for drying. | ||
| − | #Take milking | + | #Take milking cans and udder wash bucket to milking parlour. Carry larger can on round, red barrel dolly. |
#Check manger for chicken eggs and place any found in a basket from the barn. | #Check manger for chicken eggs and place any found in a basket from the barn. | ||
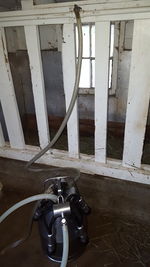
| − | #Set milking | + | #Set milking can and stool between first two stalls on the left. Attach air hose to bucket. [[File:20150907 072744.jpg|150px|thumb|right|Milk can connected to vacuum pump system via air hose ]] |
#Put a flake of alfalfa hay in manger for each cow. | #Put a flake of alfalfa hay in manger for each cow. | ||
| − | + | =====Moving Cows: Pasture to Parlour===== | |
| − | + | Halters and leads are used to transport cows to and from the pasture. | |
| − | + | #Retrieve leads from back of the milking parlour. | |
| − | + | #Turn off electric fence surrounding pasture | |
| − | + | #Put halters and leads on Daisy, Belle, and Henna. Just a lead goes around Veronica’s horns. | |
| − | + | #Open fence (untie/unhook and set out of the way so cows don’t step on the tape) | |
| − | + | #Walk cows across the property to the parlour, maintaining a cohesive, herd-like unit. | |
| − | + | #Put Veronica in 1st stanchion (the stall closet to the door), Belle in 2nd, Daisy in 3rd, Henna in 4th. | |
| − | + | #Give a scoop of grain with a quarter cup raw apple cider vinegar to each cow. | |
| − | + | ||
| − | Put Veronica in 1st stanchion (the stall closet to the door), Belle in 2nd, Daisy in 3rd, Henna in 4th. | + | |
| − | + | ||
| − | Give a scoop of grain with a quarter cup raw apple cider vinegar to each cow. | + | |
| Line 76: | Line 73: | ||
'''Milking''' | '''Milking''' | ||
| − | Teat Cleaning: WDS | + | Teat Cleaning: '''WDS''' |
| − | - | + | -'''W'''ash: Using wet rag out of Udder Wash, thoroughly clean each teat. Check orifice on bottom of teat for any dirt. |
| − | - | + | -'''D'''ry: each teat with the dry cloth. |
| − | - | + | -'''S'''trip: milk from each teat into your hand (one at a time) and check for good color and any indication of a problem, i.e. crystals in the milk. This also clears the teat orifice. |
Remove claw from the hook on the bucket. Be sure the air and milk tubes are facing toward the bucket. Listen for clicking from the pulsator. | Remove claw from the hook on the bucket. Be sure the air and milk tubes are facing toward the bucket. Listen for clicking from the pulsator. | ||
Revision as of 12:38, 17 September 2015
Contents
From the flier
Our herd share is designed to provide our community with great milk. In May of 2005 the Colorado state legislature recognized that people should have the freedom to consume raw milk. Despite the fact that it is now legal to drink fresh milk from a cow that you own, there are still relatively few raw milk dairies in operation in our area. As with our Jacob Springs Farm Meat CSA, we are committed to Organic production, but that’s just the beginning - we seek to benefit people, planet, pastures and our livestock. We are entirely grass-based and we use rotational grazing as a tool for regenerating pastures, building soil and sequestering carbon. We would love to fill you in on the details - ask us! The quality of our food matters! That’s why we focus on grass - the foundation of milk that’s rich in Omega-3’s, CLA’s, Vitamins, Beta Carotene and many other important nutrients. That’s also why we choose to milk Jersey cows (whose milk is rich in components) and why we test our cows to be sure that they only carry the A2 Beta Casein gene (see “Devil in the Milk” for more information). We love building community! We are looking to expand the milking team by adding some “work shares” ask us if you feel you might be a good fit to take on some milking responsibilities to offset costs.
Devil In The Milk: [1]
A2 Beta Casein Reference Article: [2]
Last year was the first year of the Milk Share program. This year we are milking four cows and inviting you to join in!
What: Premium, raw, grass-based milk from happy cows at your own local farm!
Why: because milk, the way it is supposed to be, is so marvelous! Healthy Jersey cows - that graze on organic grass and carry only the unmutated A2 beta casein gene - make the richest, most healthful milk for you to enjoy.
How: It’s a herd share - we provide you milk from your own cow! We will care for her, feed and milk her, and the milk is yours! We don't pasteurize it, but you can if you want to! The share costs $50 plus $52 per month boarding for a gallon per week share (about $12/gal).
Where: Pick up weekly at the farm: Jacob Springs Farm
7602 Arapahoe Road Boulder, CO 80303 farmteam@jacobsprings.com
Butter Brigade (discontinued program)
Join the Butter Brigade! An elite group of 8 members are invited to join the butter brigade. These heroic volunteers, working in pairs, come to the farm each week - one day per month for each individual - and prepare value added dairy products like butter, cheese, yoghurt, cream, ice cream and other goodies using the farm’s equipment and facility, we then split the goods between us. For cheese, justice and the American whey!
(program terminated because of scheduling complexity and high demand for regular shares)
Cows
As of February 2015, our herd consists of three A2A2 tested first-calf heifers: Daisy and Belle are purebred registered Jerseys purchased in July 2014 from a commercial dairy in Utah. Veronica is a 7/8 Jersey 1/8 Shorthorn cross; she came from a family of nurse cows from a ranch in Larkspur, Colorado.Since the program is structured as a herd share program, legal agreements are required to transfer shares in the herd and provide a structure for care of the animals. These documents are included here for reference.
Documents and records
Milking procedures
Preparation
- Assemble claw and lid; affix to milking bucket. (x2.)
- Make sure there are clean jars, lids and rings available for later pouring.
- Prepare cleaning supplies to take into the milking parlour:
- Fill Udder Wash bucket with hot water and add a capful of FC-98 Sanitizing Udder Wash.
- Swish cap in hot water to clean it before putting back on container.
- Get 2 dairy rags. One goes into the udder wash and one will be used for drying.
- Take milking cans and udder wash bucket to milking parlour. Carry larger can on round, red barrel dolly.
- Check manger for chicken eggs and place any found in a basket from the barn.
- Set milking can and stool between first two stalls on the left. Attach air hose to bucket.
- Put a flake of alfalfa hay in manger for each cow.
Moving Cows: Pasture to Parlour
Halters and leads are used to transport cows to and from the pasture.
- Retrieve leads from back of the milking parlour.
- Turn off electric fence surrounding pasture
- Put halters and leads on Daisy, Belle, and Henna. Just a lead goes around Veronica’s horns.
- Open fence (untie/unhook and set out of the way so cows don’t step on the tape)
- Walk cows across the property to the parlour, maintaining a cohesive, herd-like unit.
- Put Veronica in 1st stanchion (the stall closet to the door), Belle in 2nd, Daisy in 3rd, Henna in 4th.
- Give a scoop of grain with a quarter cup raw apple cider vinegar to each cow.
Milking
Teat Cleaning: WDS
-Wash: Using wet rag out of Udder Wash, thoroughly clean each teat. Check orifice on bottom of teat for any dirt.
-Dry: each teat with the dry cloth.
-Strip: milk from each teat into your hand (one at a time) and check for good color and any indication of a problem, i.e. crystals in the milk. This also clears the teat orifice.
Remove claw from the hook on the bucket. Be sure the air and milk tubes are facing toward the bucket. Listen for clicking from the pulsator.
Kink 3 of the inflations to block air flow, and open the valve.
Kink the 4th inflation and release it on to the corresponding teat. If you have proper suction, it will draw up the teat on its own.
Repeat this with remaining inflations/teats.
Note: if you hear a sucking or slurping noise, the inflation is not on the teat correctly, or the teat is empty. The friction from the inflation will cause chafing and chapping, or could precede the claw coming off the teats completely, so tend to this quickly.
Watch the flow of milk in the tube. When it slows down, manually compress udder from top down to help drain. Squeeze firmly at the top by placing your hands on opposite sides of the udder and pull down toward teats (be careful to not squeeze and send milk back up into udder). Repeat as necessary.
Once no more milk is flowing, close valve and remove from teats. Raise tubing and open valve to drain milk into bucket, then hang claw on hook.
While first cow is being milked, wash and start milking cow in third stanchion using same procedures.
Remove air hose and weigh the can on the scale in the back room.
Return bucket and reattach air hose. Repeat cleaning, milking, and weighing for next cow.
After milking and weighing milk from first two cows, give each cow a second scoop of grain.
Repeat process until all cows have been milked and cans have been weighed.
Once finished, turn off pump and return cows to pasture.
Take the milk bucket and udder wash back to the farm kitchen. Pour milk into half gallon bottles, wipe clean, put lids and rings on and put bottles in sink with running cold water to cool. Make note of the time bottles start cooling. Keep water running for 10 minutes, then shut off water and add as many ice packs as will fit.
Rinse claw and lid with hot water to prevent milk drying inside.
Equipment Cleaning Procedures
-Put on cleaning gloves (marked for dairy use)
-Fill a sink with 2-3 gallons of hot water. Place ¼ cup FC509 In the sink as it fills and swish around with water to dissolve.
-Dismantle the lid, set pulsator aside.
-Take apart all other apparatus and place in sink.
-Scrub each part with a brush and run plenty of water through tubing.
-Put a scoop of water (use large yogurt container) into milking bucket and scrub the bucket inside and out.
-Drain sink, then refill with 2-3 gallons lukewarm water.
-Place the measuring cup with 8ml FC350 (acid) into the water and gently swish. Avoid splashing the acid anywhere.
-Repeat scrubbing and washing procedure on all equipment.
-Drain sink and rinse everything with hot water.
-Set or hang all pieces to air dry.
Customer Prep
-After milk has cooled 1½ to 2 hours, remove from sink and wipe dry.
-Look up that day’s orders. Prep jars by placing name magnets on lids.
-Move any bottles from the cooling tray in the refrigerator to top shelf for customer pick up.
-If there is extra milk after filling orders, label jars with day of the week.
-Put thawed ice packs in the freezer after wiping dry.
-Put fresh ice packs in between bottles in the cooling tray to continue cooling process.
Clean Milking Parlour:
-Clean up floor as needed (broom is in back half of the parlour.)
-If there is urine on the floor, sweep to drain with broom.
-If there is fecal matter, use a small amount of soapy water on the floor, brush thoroughly, and sweep to drain.
-If there is a large amount of water pooling outside the barn door, sweep away to disperse for better drying.
-If water was used, leave barn door open for air circulation.
-Turn off light.
WEEKLY:
Pull windows from claws and use bottle brushes to clean thoroughly.
Refrigerated Cooling Tray:
-Empty all water from tray
-Wipe down inside
-Refill with cold water
-Return to refrigerator
Change out milking lid and claw
Power Wash Kitchen Floor
Power Wash Milking Parlor
MONTHLY:
Clean all milk tubing with scraper and brush.


